Product docs and API reference are now on Akamai TechDocs.
Search product docs.
Search for “” in product docs.
Search API reference.
Search for “” in API reference.
Search Results
results matching
results
No Results
Filters
How to Use Nomad for Container Orchestration
Traducciones al EspañolEstamos traduciendo nuestros guías y tutoriales al Español. Es posible que usted esté viendo una traducción generada automáticamente. Estamos trabajando con traductores profesionales para verificar las traducciones de nuestro sitio web. Este proyecto es un trabajo en curso.
Nomad is an open source workload orchestration and scheduling system that offers a simplified and flexible alternative to Kubernetes. Nomad can deploy and manage both containerized and non-containerized applications across efficient, highly scalable clusters. Nomad is part of the HashiCorp ecosystem, giving it built-in integration with tools like Consul, Terraform, and Vault. Learn more about Nomad and how it compares to Kubernetes in our guide Kubernetes vs Nomad: Which Is Better? .
In this tutorial, learn how to get started understanding and using Nomad effectively. Begin by installing a single Nomad instance to get a sense of its interface and cluster structure. Then see how to leverage Terraform and Consul to deploy a full Nomad cluster with Docker for containerized applications.
How to Install Nomad
This section outlines how to install Nomad and access its interface in order to familiarize yourself with Nomad’s method of handling jobs.
If, instead, you are ready to start deploying a Nomad cluster now, skip to the How to Deploy a Cluster with Nomad section.
Deploying Nomad from the Linode Marketplace
The most approachable solution for setting up a Nomad instance with Linode is through the Linode Marketplace. There, a Linode instance with Nomad already installed and configured can be quickly set up. To do so, take a look at our guide to Deploy HashiCorp Nomad through the Linode Marketplace .
First, follow along with that guide to get a Nomad instance ready. Then skip to the section How Nomad Works to become familiar with the new Nomad instance.
Manually Installing Nomad
Follow the steps here to install Nomad manually. These walk through everything needed to get a Nomad instance configured and able to access the Nomad interface.
Before You Begin
If you have not already done so, create a Linode account and Compute Instance. See our Getting Started with Linode and Creating a Compute Instance guides.
Follow our Setting Up and Securing a Compute Instance guide to update your system. You may also wish to set the timezone, configure your hostname, create a limited user account, and harden SSH access. A Linode instance is needed to run Nomad on, so follow the linked guides here to start up and configure your own instance:
sudo. If you’re not familiar with the sudo command, see the
Users and Groups
guide.Installing Nomad on Debian and Ubuntu
To install Nomad on Debian or Ubuntu, follow the steps below:
Install the prerequisite packages for adding the HashiCorp repository to the APT package manager:
sudo apt install wget gpg coreutilsAdd the GPG key for the HashiCorp repository:
wget -O- https://apt.releases.hashicorp.com/gpg | gpg --dearmor | sudo tee /usr/share/keyrings/hashicorp-archive-keyring.gpgAdd the HashiCorp repository to the APT package manager:
echo "deb [signed-by=/usr/share/keyrings/hashicorp-archive-keyring.gpg] https://apt.releases.hashicorp.com $(lsb_release -cs) main" | sudo tee /etc/apt/sources.list.d/hashicorp.listUpdate APT’s indices and install Nomad:
sudo apt update
sudo apt install nomad
Installing Nomad on Alma, CentOS, Fedora, and Rocky
To install Nomad on AlmaLinux, CentOS Stream, Fedora, or Rocky Linux, follow the steps below:
Install the configuration manager for the DNF package manager:
sudo dnf install dnf-plugins-coreUse the configuration manager to add the HashiCorp repository to DNF:
On AlmaLinux, CentOS Stream, and Rocky Linux, use the RHEL URL:
sudo dnf config-manager --add-repo https://rpm.releases.hashicorp.com/RHEL/hashicorp.repoOn Fedora, use the Fedora URL:
sudo dnf config-manager --add-repo https://rpm.releases.hashicorp.com/fedora/hashicorp.repo
Install Nomad:
sudo dnf install nomad
Verifying Your Nomad Installation
Once you have completed the installation steps above, verify the Nomad installation with the following command:
nomad --versionNomad v1.5.2Installing CNI Plugins for Nomad
Nomad uses CNI plugins to support some network features, particularly its bridge mode. The CNI plugins are required when using network namespaces within Nomad clusters.
Completing this part of the setup is optional, but generally recommended.
Install the CNI plugins with the following set of commands:
curl -L -o cni-plugins.tgz "https://github.com/containernetworking/plugins/releases/download/v1.0.0/cni-plugins-linux-$( [ $(uname -m) = aarch64 ] && echo arm64 || echo amd64)"-v1.0.0.tgz
sudo mkdir -p /opt/cni/bin
sudo tar -C /opt/cni/bin -xzf cni-plugins.tgz
To further support network traffic over bridge connections, adjust your system’s
iptables. Nomad provides the configurations implemented below for this purpose. These lines set the necessaryiptablesvalues, and adding them to a file ensures they persist at system startup. Run the following command to create abridge.conffile within the/etc/sysctl.d/directory:sudo tee /etc/sysctl.d/bridge.conf > /dev/null <<EOF net.bridge.bridge-nf-call-arptables = 1 net.bridge.bridge-nf-call-ip6tables = 1 net.bridge.bridge-nf-call-iptables = 1 EOFLoad the new file into the current
sysctlconfiguration:sudo modprobe br_netfilter sudo sysctl -p /etc/sysctl.d/bridge.conf
How Nomad Works
With the Nomad instance up and running, it’s time to start exploring how Nomad works. This section provides the basics to navigate Nomad’s features.
Using Nomad
First, start up a Nomad development agent:
nomad agent -devNote Nomad instances created through the Linode Marketplace are already running a Nomad agent at startup, so above command is not needed.The agent makes a Nomad web interface available, serving it on
localhost:4646. Use an SSH tunnel to access this in a web browser from a remote machine:On Windows, use the PuTTY tool to set up the SSH tunnel. Follow the PuTTY section of our guide on how to Create an SSH Tunnel for MySQL Remote Access . Use
4646as the Source port and127.0.0.1:4646as the Destination.On macOS or Linux, use the following command to set up the SSH tunnel. Replace
example-userwith your username on the remote server and192.0.2.0with the remote server’s IP address:ssh -L4646:localhost:4646 example-user@192.0.2.0
Navigate to
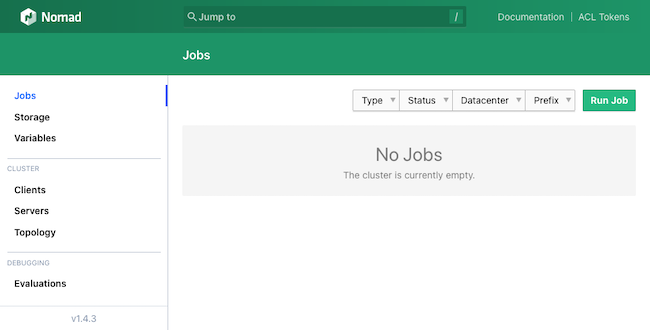
localhost:4646in a web browser to see the Nomad interface.
Nomad Structure
One of the best ways to get familiar with Nomad is through navigating the options available in its interface. However, Nomad has a set of core concepts that its operations are structured around. Getting familiar with those is essential for using Nomad effectively.
What follows is a brief overview of these key essentials for grasping the Nomad cluster architecture. Find additional details and more particulars in Nomad’s vocabulary documentation .
A Nomad agent runs on each Node in the Nomad cluster and can be either a server agent or a client agent. Agents do all the work behind Nomad, and it is the presence of this agent network that makes up the Nomad cluster.
A Nomad server agent manages jobs and clients. Each server node communicates with the other server nodes for high availability and awareness across multiple regions. Servers also manage job schedules and disseminate jobs to appropriate client nodes when jobs need executed.
A Nomad client agent watches for jobs from its region’s server nodes and executes any tasks within those jobs. Essentially, clients are the units that fulfill jobs, running the necessary tasks, whether batch processes, services, or otherwise.
A Nomad job is a collection of one or more tasks to be handled by a client. Tasks are collected into groups within their jobs. Each task in turn contains a single unit of work to be executed by a client agent.
How to Deploy a Cluster with Nomad
The above sections should provide a solid foundational understanding of Nomad. However, Nomad is typically deployed in a cluster with an array of server and client nodes to execute jobs.
The rest of this tutorial outlines a straightforward method for deploying a complete Nomad cluster using Terraform for provisioning and Consul for networking.
This setup is meant to serve as a basis for your own specific use case. For that reason, the setup favors a clear and simplified approach. Doing so leaves a few features to be added and enhancements to be pursued. The conclusion to this tutorial provides some suggestions to make this setup best fit your particular needs.
Overview of Terraform Provisioning
Probably the most effective way to deploy a Nomad cluster is through Terraform , another tool by HashiCorp. With Terraform, you can provision infrastructure as code, automating the deployment process. This is especially convenient with Nomad. Terraform coordinates configuration and deployment between all nodes in a cluster, in addition to saving manual installation and setup time on each node. Learn more about using Terraform, particularly for provisioning Linode instances, in our Beginner’s Guide to Terraform .
This tutorial leverages our custom Terraform script to deploy the Nomad cluster. The Terraform script here emphasizes simplicity and readability, which is helpful for getting started with your own uses.
Here’s a rundown of what the Terraform script does:
Creates a given number of Nomad server and client nodes. All instances deploy within a single region and leverage Linode’s VLAN feature for virtual private cloud (VPC) communications between nodes.
Executes a script on each node to install Nomad, Consul, and Docker.
Runs a script on each server node to provide an initial Consul and Nomad server configuration. Repeats the process for each client node, setting the configurations for communication with the server nodes.
Starts up Consul and Nomad so that the cluster is up-and-running and accessible by the end of the Terraform process.
Deploying the Cluster with Terraform
Follow the steps outlined here when ready to deploy your own Nomad cluster. These get Terraform set up, prepares the script, and starts provisioning the cluster.
Install Terraform by following the official installation guide . This sets you up with the Terraform command line interface (CLI).
Download a
.ziparchive of our Terraform script for deploying the Nomad cluster and its accompanying files.Once downloaded, unzip the archive with the
unzipprogram. The set of commands below place the Terraform directory in your current user’s home directory:mv example-nomad-terraform.zip ~/ cd ~/ unzip example-nomad-terraform.zipThis should result in a
~/example-nomad-terraform/directory, navigate into it:cd ~/example-nomad-terraform/Note Any further commands and file references assume you are operating out of this directory.Open the
terraform.tfvarsfile, and configure the variables there. Here is a breakdown of the variables and how to set them:tokenneeds your Linode API token. Terraform uses this to provision Linode instances. Follow our Get an API Access Token guide to generate a personal access token. Be sure to give the token “Read/Write” permissions.ssh_keystakes a list of SSH public keys. These keys are added to the known hosts on each node, allowing SSH access to the nodes. Enter the full public key for your local machine in one line.root_passwordis used to set up a root password for each node.server_countandclient_countdictate the number of Nomad server and client nodes to provision, respectively. Nomad recommends three or five server nodes for each region. This tutorial uses three server nodes and three client nodes.regiondetermines what Linode region the nodes should be created in. The full list of regions and their designations is available via the Linode regions API . However, this tutorial uses Linode’s VLAN feature, which is only available for certain regions. Those regions are listed on the VLAN Overview page.linode_imagepoints to an image to use for each node. The default for this tutorial is an Ubuntu 20.04 LTS image. Find a list of possible images via the Linode images API . Be aware that changing the image requires accordingly adjusting the scripts for installing Consul, Nomad, and Docker.server_typeandclient_typeindicate the Linode instance types to use for the server and client nodes, respectively. The default provides a Dedicated 4GB instance for each Nomad server, as recommended, and a Linode (shared) 4GB instance for each Nomad client. Find a full list of the instance type designations via the Linode types API .
Warning Sensitive infrastructure data, such as passwords and tokens, are visible in plain text within theterraform.tfvarsfile. Review Secrets Management with Terraform for guidance on how to secure these secrets.Initialize the Terraform script, which installs the required provisioners, then apply the script to start the provisioning process:
terraform init
terraform apply
The process runs for a while as Terraform first sets up the server instances, then the client instances, and then runs the necessary scripts. Once the process has finished, a message like this should appear:
Apply complete! Resources: 12 added, 0 changed, 0 destroyed.At this point, access the Nomad interface to check that the cluster is running and connected. In a web browser, navigate to port
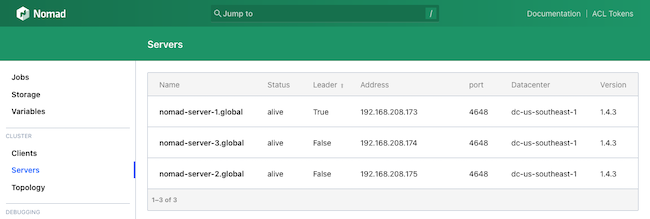
4646on the public IP address for one of the cluster’s server nodes. For instance, ifnomad-server-1has the public IP address192.0.2.0, navigate to192.0.2.0:4646in your browser.Use the left-hand menu to navigate to the Server page to see a list of the Nomad servers deployed in the cluster:
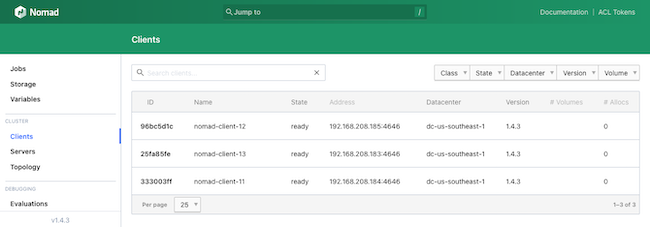
Navigate to the Clients page from the same menu to see a list of the deployed Nomad clients:
Creating a Docker Job
To see the Nomad cluster in action, create and execute a simple job on it. This can actually be done right from within the Nomad web interface.
This example uses a simple Docker image to have each client node echo “Hello, world!” via an HTTP server.
Open the Nomad web interface from one of the server nodes, as described in the previous section.
Navigate to the Jobs page from the left-hand menu, and select the Run Job button from the upper right.
This prompts for a Job Definition, where an HCL script can be inserted to define a job. For this example, use the job script provided below:
 1
 2
 3
 4
 5
 6
 7
 8
 9
10
11
12
13
14
15
16
17
18
19
20
21
22
23
24
25
26
27
28
29
30
31
32
33
job "example-docker-job" { datacenters = ["dc-us-southeast-1"] type = "service" group "docker-example" { count = 3 task "docker-server" { driver = "docker" config { image = "hashicorp/http-echo:latest" args = [ "-listen", ":3030", "-text", "Hello, world!", ] } resources { network { mbits = 10 port "http" { static = "3030" } } } } } }
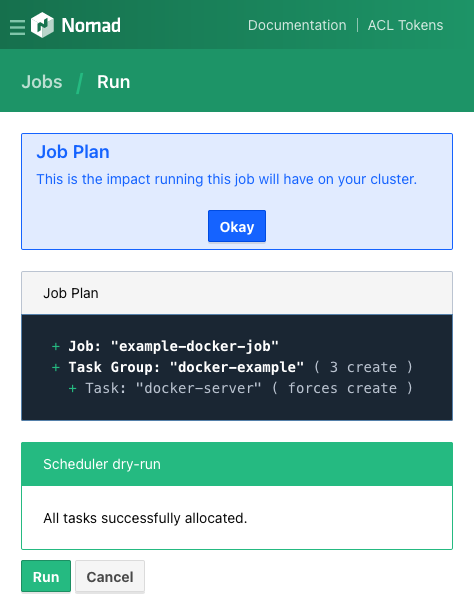
This creates a job named
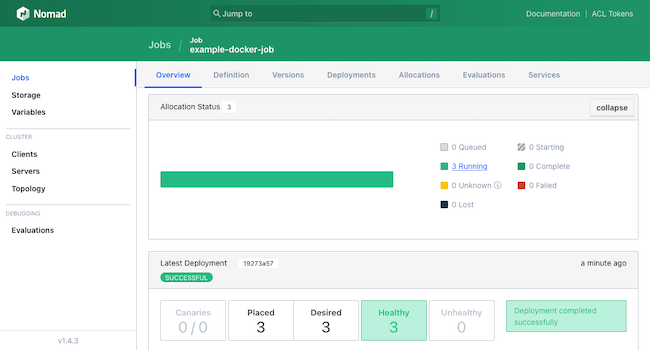
example-docker-joband a group of threedocker-servertasks to start up HashiCorp’shttp-echoDocker image on three client nodes.Select the Plan button at the bottom of the page. If presented with a summary of the job, accept it using the Run button at the bottom of the page.
This should open the Jobs page, with a summary of its execution. The page provides metrics on the job, including breakdowns of the job group and its tasks. The page also provides an option to stop the job.
To see the results served by Docker, navigate to port
3030on the public IP address of one of the client nodes. For instance, if one of the clients has the public IP address192.0.2.12, navigate to192.0.2.12:3030in a web browser.Hello, world!
Conclusion
You now know how to start orchestrating workloads with Nomad. This tutorial contains steps for everything from running a single Nomad instance to deploying an entire Nomad cluster.
The Terraform deployment above is meant as a simple, accessible base. Continue enhancing this to better meet your own specific needs. The following are some initial ideas to start out with:
Use Packer to build initial images. This saves deployment time and would replace the steps in the
nomad-installations.shscript. Learn more about Packer and using it to create Linode images in our guide Using the Linode Packer Builder to Create Custom Images .Leverage Consul’s Access Control List (ACL) features to bolster the cluster’s security. These features can secure the cluster’s access points through ACL policies. Learn more in HashiCorp’s Secure Consul with Access Control Lists documentation.
Implement multiple regions in the Nomad cluster. Nomad supports multi-region federation, allowing for reliably configuring clusters to coordinate across data centers in different regions. Learn more about this process in Nomad’s Multi-region Federation documentation.
In addition to the links provided above and throughout this tutorial, refer to HashiCorp’s Nomad tutorials linked below. These can help expand your understanding of Nomad and its capabilities to get the most out of your own cluster.
More Information
You may wish to consult the following resources for additional information on this topic. While these are provided in the hope that they will be useful, please note that we cannot vouch for the accuracy or timeliness of externally hosted materials.
This page was originally published on

